Tuesday 31 July 2012

Data Wiping


Don't confused data wiping with 'delete or format data', delete and format your hard disk is simply marks file space as available for reuse, data wiping overwrites all data space on a storage device, replacing useful data with garbage data. Depending upon the method used, the overwrite data could be zeros (also known as “zero-fill”) or could be various random patterns.

Products that can be used for wiping hard disks might not be suitable for wiping other types of drives. In this article, we will look at methods for securely wiping hard disks, USB flash memory devices, flash memory cards, and SSDs

Hitachi
Drive Fitness Test (see website for specific models supported)
http://www.hitachigst.com/hdd/support/download.htm#DFT
Select the Erase Drive feature to zero-fill your hard disk

Samsung
HUtil (see website for specific models supported)
http://www.samsung.com/global/business/hdd/support/utilities/Support_HUTIL.html
Use Tool, Erase HDD to zero-fill your hard disk

Seagate (including Maxtor)
SeaTools for DOS (see website for specific models supported)
http://www.seagate.com/www/en-us/support/downloads/seatools
Use Full Erase to zero-fill your hard disk

Western Digital
Data Lifeguard Diagnostics (select drive model for specific version recommended)
http://support.wdc.com/product/download.asp?lang=en
Use Write Zeros to drive to zero-fill your hard disk

the steps:

  1. Determine the brand and model of hard disk you want to overwrite.
  2. Download a CD ISO image or a floppy disk image (depending upon your equipment) and use the image to create bootable media. The floppy disk image is self-contained: run it, insert a blank floppy disk when prompted, and the image is created on the disk. You will need to use a CD burning program that works with ISO images to convert the ISO image into a bootable CD.
  3. Restart your computer with the bootable media you created in Step 2.
  4. Select the hard disk to zero-fill when prompted.
  5. Choose the option to zero-fill the hard disk.
  6. When the program is finished, follow the on-screen instructions to shut down or restart your computer.
  7. Remove the wiped hard disk; you can now reuse or recycle the hard disk.


*** don't use this method if you are not sure of what are you doing, ask our technician for guide. This method is used to completely whip your data.


PakarPC No 23-1, Block A, No 2 Jalan Langkawi 53300 Setapak Kuala Lumpur FB:facebook.com/thepakarpc 
Hotline:1800-88-7508

Windows Shortcut Keys


Windows System Key combinations

  • F1: Help
  • CTRL+ESC: Open Start menu
  • ALT+TAB: Switch between open programs
  • ALT+F4: Quit program
  • SHIFT+DELETE: Delete item permanently
  • Windows Logo+L: Lock the computer (without using CTRL+ALT+DELETE)


Windows Program Key Combinations

  • CTRL+C: Copy
  • CTRL+X: Cut
  • CTRL+V: Paste
  • CTRL+Z: Undo
  • CTRL+B: Bold
  • CTRL+U: Underline
  • CTRL+I: Italic


General keyboard-only commands

  • F1: Starts Windows Help
  • F10: Activates menu bar options
  • SHIFT+F10 Opens a shortcut menu for the selected item (this is the same as right-clicking an object
  • CTRL+ESC: Opens the Start menu (use the ARROW keys to select an item)
  • CTRL+ESC or ESC: Selects the Start button (press TAB to select the taskbar, or press SHIFT+F10 for a context menu)
  • CTRL+SHIFT+ESC: Opens Windows Task Manager
  • ALT+DOWN ARROW: Opens a drop-down list box
  • ALT+TAB: Switch to another running program (hold down the ALT key and then press the TAB key to view the task-switching window)
  • SHIFT: Press and hold down the SHIFT key while you insert a CD-ROM to bypass the automatic-run feature
  • ALT+SPACE: Displays the main window's System menu (from the System menu, you can restore, move, resize, minimize, maximize, or close the window)
  • ALT+- (ALT+hyphen): Displays the Multiple Document Interface (MDI) child window's System menu (from the MDI child window's System menu, you can restore, move, resize, minimize, maximize, or close the child window)
  • CTRL+TAB: Switch to the next child window of a Multiple Document Interface (MDI) program
  • ALT+underlined letter in menu: Opens the menu
  • ALT+F4: Closes the current window
  • CTRL+F4: Closes the current Multiple Document Interface (MDI) window
  • ALT+F6: Switch between multiple windows in the same program (for example, when the Notepad Find dialog box is displayed, ALT+F6 switches between the Find dialog box and the main Notepad window)


Shell objects and general folder/Windows Explorer shortcuts
For a selected object:

  • F2: Rename object
  • F3: Find all files
  • CTRL+X: Cut
  • CTRL+C: Copy
  • CTRL+V: Paste
  • SHIFT+DELETE: Delete selection immediately, without moving the item to the Recycle Bin
  • ALT+ENTER: Open the properties for the selected object


General folder/shortcut control

  • F4: Selects the Go To A Different Folder box and moves down the entries in the box (if the toolbar is active in Windows Explorer)
  • F5: Refreshes the current window.
  • F6: Moves among panes in Windows Explorer
  • CTRL+G: Opens the Go To Folder tool (in Windows 95 Windows Explorer only)
  • CTRL+Z: Undo the last command
  • CTRL+A: Select all the items in the current window
  • BACKSPACE: Switch to the parent folder
  • SHIFT+click+Close button: For folders, close the current folder plus all parent folders


Dialog box keyboard commands

  • TAB: Move to the next control in the dialog box
  • SHIFT+TAB: Move to the previous control in the dialog box
  • SPACEBAR: If the current control is a button, this clicks the button. If the current control is a check box, this toggles the check box. If the current control is an option, this selects the option.
  • ENTER: Equivalent to clicking the selected button (the button with the outline)
  • ESC: Equivalent to clicking the Cancel button
  • ALT+underlined letter in dialog box item: Move to the corresponding item


PakarPC No 23-1, Block A, No 2 Jalan Langkawi 53300 Setapak Kuala Lumpur FB:facebook.com/thepakarpc 
Hotline:1800-88-7508

Monday 30 July 2012

How to Enable underlining of keyboard shortcuts

Windows has many menu shortcut keys, but they're hidden by default. To enable the underlining of the shortcuts, go to:
 Control Panel > Ease of Access Center > Change how your keyboard works.

Click on the box next to "Underline keyboard shortcuts and access keys," then hit the OK or Apply button to save.


PakarPC. No 23-1, Block A, No 2 Jalan Langkawi 53300 Setapak Kuala Lumpur FB:facebook.com/thepakarpc
Hotline:1800-88-7508

Sunday 15 July 2012

Free Tools to copy/move Tera Bytes files size fast?


Copy Type:TeraCopy

Copy Type: Normal Windows Copy

If you want to transfer a huge amount of files (ie:movie, software) fast why not try to use 'TeraCopy'.TeraCopy is a freeware app that move file at the maximum possible speed, providing the user a lot of features.

 Features of TeraCopy Copy files faster.

  • TeraCopy uses dynamically adjusted buffers to reduce seek times. Asynchronous copy speeds up file transfer between two physical hard drives. 
  • Pause and resume file transfer Feature. Pause copy process at any time to free up system resources and continue with a single click. 
  • Error recovery. In case of copy error, TeraCopy will try several times and in the worse case just skips the file, not terminating the entire transfer. 
  • Interactive file list. TeraCopy shows failed file transfers and lets you fix the problem and recopy only problem files. 
  • Shell integration. TeraCopy can completely replace Explorer copy and move functions, allowing you work with files as usual.


download here
 'oncall service and repair'
-team PakarPC-
1800-88-7508

Saturday 7 July 2012

Basic Computer

Let's learn basic computer:

How to Identify Device ID

check the 'Device Manager' to find the 'unknown device' or the 'problem component'

example 1

example 2


open the problem devices link as shown above


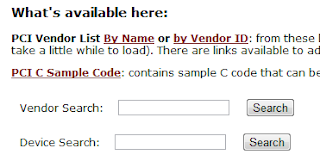
in the graphic above the no.1 and no.2 are the vendor and device id.  now open your browser and go to www.pcidatabase.com. type the code (no.1 and no.2) in the box as below.

The Steps
  • First, look at the "PCI Device" in the 'Device Manager'
  • Double-click "PCI Device" or right-click and select "Properties". Once in here, go to the "Details" tab. or You can click search and go to system information. Find the 'Component' and go to  'Problem Device' Notice that the "VEN" entry and the "DEV" entry. That is your Vendor ID and your Device ID. The way I look at is is like this:  In this example, the Vendor ID (VEN_xxxx) is "10EC" and the Device ID (DEV_xxxx) is "8172".
  • Now that you have your Vendor ID and your Device ID, go to PCIDatabase and you should see the "Vendor Search" and "Device Search" boxes.
'oncall service and repair'

-team PakarPc'
1800-88-7508

Friday 6 July 2012

How to Change Windows Product Key


Use command line.

  • Click on the Start Button and type: CMD (into the 'Search programs and files' field in the Start Menu)
  • The Start Menu will show 'CMD.exe', 
  • Right-click the CMD.exe file and select Run As Administrator.
  • In the CMD window, type: slmgr.vbs -ipk <type your product key here>
  • Once done, type slmgr.vbs -ato to activate your Windows 7.


'oncall service and repair'
-team PakarPC-
1800-88-7508

USB Device Not Detected / Unknown Device


Click Start, and then click Run.
  • Note If you are running Windows Vista, click Start, and then use the Start Search box.
  • Type devmgmt.msc, and then click OK. Device Manager opens.
  • Expand Universal Serial Bus controllers.
  • Note You might have to scroll down the list to find this item.
  • Right-click the first USB controller under Universal Serial Bus controllers, and then click Uninstall to remove it.
  • Repeat step 4 for each USB controller that is listed under Universal Serial Bus controllers.
  • Restart the computer. After the computer starts, Windows will automatically scan for hardware changes and reinstall all the USB controllers that you uninstalled.
  • Check the USB device to see whether it is working.

'oncall service and repair'
-team PakarPC-
1800-88-7508


Wednesday 4 July 2012

Free SMS in Gmail

Send free SMS directly from Gmail - just enter a phone number and click Enter. SMS replies come right to your Gmail inbox.

How to:

  1. You can send SMS messages to your contacts’ mobile phones using Gmail Chat. To do so from Gmail:
  2. Enter your contact’s name in the ‘Search or invite friends’ box in Chat, and select Send SMS from the box of options that appears to the right of your contact’s name. Or, if you already have a Chat window open for this contact, just click Options, and select Send SMS.
  3. In the dialog box, enter a phone number in the ‘Send SMS messages to this number’ field. This feature is only launched in selected countries. Click here for the list of supported countries and operators. If you are not located in one of these countries you can still use it, but you won't see the SMS option in Chat until you enable it manually in the Chat settings page.
  4. Click Save.
  5. A Chat window appears. Just type your message as you would normally. When you hit Enter, the message will be sent to the phone number you entered.
If your contact replies, the text message response will appear as a reply in Chat. These conversations are stored in your Chat history just like regular chats (but keep in mind that you can’t go off the record while communicating via SMS).

SMS charges: Google does not charge for using this service. However, mobile providers' standard charges will apply to any SMS messages sent from a mobile device to Google Chat. Please check your mobile provider's price plan for details.


Operator Supported:
Digi, Celcom and Maxis


'oncall service and repair'
-team PakarPC-
1800-88-7508

Monday 2 July 2012

Free Tools to Delete Windows Temporary Files


If you want a free advance audio player for Windows platform 'foobar2000' is available for you. Some basic features include full univode support, ReplayGain support and native support for several popular audio formats

Main features
  • Supported audio formats: MP3, MP4, AAC, CD Audio, WMA, Vorbis, FLAC, WavPack, WAV, AIFF, Musepack, Speex, AU, SND... and more with additional components.
  • Gapless playback.
  • Full unicode support.
  • Easily customizable user interface layout.
  • Advanced tagging capabilities.
  • Support for ripping Audio CDs as well as transcoding all supported audio formats using the Converter component.
  • Full ReplayGain support.
  • Customizable keyboard shortcuts.
  • Open component architecture allowing third-party developers to extend functionality of the player.

download here:


'oncall service and repair'
-team PakarPC-
1800-88-7508

Free Tools to Delete Windows Temporary Files


If you want to delete Windows temporary files the easy way, you can download 'Cleano'. This application is tiny (just 180Kb) and it is freeware. You don't have to install Cleano because it is protable application.

cleano delete:
  • user’s temporary files.
  • user’s recent items.
  • user’s Internet Explorer temporary files.
  • user’s Desktop Run history.
  • Windows prefetch files.
  • Windows temporary files.
  • user’s custom folders.
  • user’s NetHood items.
download here


'oncall service and repair'
-team PakarPC-
1800-88-7508

Computer Maintenance

What should you do?

1. Hard Drive Maintenance
  • scandisk (check erroes and correct these errors automatically)
  • disk defragmenter
2. Deleting Files
  • delete temporary files (tmp)
  • delete temporary internet files and cookies
3. Software Maintenance
  • remove unnecessary softwares
  • software updates (especially antivirus and operating system patches)
4. Backup and Data Recovery
  • backup data (as needed or schedule)
5. Virus, Rootkit, Malware and Spyware Protection
  • scanning and updating virus database

Some Steps and Guidelines on How to..

1. Clean up Temporary Files
Microsoft recommends that computers running the Windows operating system should have the temporary files cleaned weekly.


Windows Vista / Windows 7
  1. Open Task Scheduler by clicking the Start button, clicking Control Panel, clicking System and Security, clicking Administrative Tools, and then double-clicking Task Scheduler.‌ (Administrator permission required. If you are prompted for an administrator password or confirmation, type the password or provide confirmation.)
  2. Click the Action menu, and then click Create Basic Task.
  3. In the Basic Task Wizard, type a name for the task and an optional description, and then click Next.
  4. To select a schedule based on the calendar, click Daily, Weekly, Monthly, or One time, and then click Next.
  5.  Specify the schedule you want to use, and then click Next.
  6. Click Start a program, and then click Next.
  7. Click Browse, type cleanmgr.exe in the File name box, click Open, and then click Next.
  8. Click Finish.
  9. When the program starts (as scheduled) select the boxes in the Files to delete list and click OK. If prompted, click Yes to confirm the deletion.

Windows XP
  1. Click Start, and then click My Computer.
  2. Right-click Local Disk, and then click Properties.
  3. On the General tab, click the Disk Cleanup button. Disk Cleanup will spend a few minutes examining The Disk Cleanup dialog box will appear. Select each of the check boxes in the Files to delete list, and then click OK.
  4. When prompted, click Yes. Disk Cleanup will spend several minutes removing these files, which will provide you with more space.
  5. If you have more than one hard disk drive, repeat this process for each hard disk drive listed in My Computer.

2. Defragment Your Hard Disk
Microsoft recommends that computers running the Windows operating system should be defragmented weekly.

Windows 7
  1. Open Disk Defragmenter by clicking the Start button. In the search box, type Disk Defragmenter, and then, in the list of results, click Disk Defragmenter.
  2. Click Configure schedule....
  3. In the Disk Defragmenter: Modify Schedule dialog box, choose how often, which day, what time of the day you want defragmentation to occur, and which drives, and then click OK.
  4. Click OK again.

Windows Vista
  1. Open Disk Defragmenter: Click the Start button, click All Programs, click Accessories, click System Tools, and then click Disk Defragmenter. If you are prompted for an administrator password or confirmation, type the password or provide confirmation.
  2. Click Modify schedule....
  3. In the Disk Defragmenter: Modify Schedule dialog box, choose how often, which day, and at what time of the day you want defragmentation to occur, and then click OK.
Windows XP
  1. Click Start, and then click Control Panel.
  2. Click Performance and Maintenance.
  3. Click Scheduled Tasks.
  4. In the Scheduled Tasks window, double-click Add Scheduled Task.
  5. In the Scheduled Task Wizard, click Next.
  6. Click Browse.
  7. In the File name box, type %systemroot%\system32\defrag.exe, and then click Open.
  8. Under Perform this task, click Weekly, and then click Next.
  9. Set the time and day of the week you would like to defragment your hard drive. For best results, choose a time when your computer will be on but you will be away from it, and then click Next.
  10. If prompted, type your password in both the Enter the password and Confirm password boxes, and then click Next.
  11. Select the Open advanced properties for this task when I click Finish check box, and then click Finish.
  12. In the Run box, add C: to the existing command. Make sure you include a space before the “C:”. Then, click OK.
  13. In the Set Account Information dialog box, if prompted, type your password in both the Password and Confirm password boxes, and then click OK.

3. Check for Disk Errors
Microsoft recommends that computer running the Windows operating system should be checked for disk errors weekly.

Windows Vista / Windows 7
  1. Open Task Scheduler by clicking the Start button, clicking Control Panel, clicking System and Security, clicking Administrative Tools, and then double-clicking Task Scheduler.‌ (Administrator permission required. If you're prompted for an administrator password or confirmation, type the password or provide confirmation.)
  2. Click the Action menu, and then click Create Basic Task.
  3. In the Basic Task Wizard, type a name for the task and an optional description, and then click Next.
  4. To select a schedule based on the calendar, click Daily, Weekly, Monthly, or One time, and then click Next.
  5. Specify the schedule you want to use, and then click Next.
  6. Click Start a program, and then click Next.
  7. Click Browse. Then, navigate to windows\system32\chkdsk.exe.
  8. Select chkdsk.exe, and then click Open.
  9. Click Finish.

 Windows XP
  1. Click Start, and then click Control Panel.
  2. Click Performance and Maintenance.
  3. Click Scheduled Tasks.
  4. In the Scheduled Tasks window, double-click Add Scheduled Task.
  5. In the Scheduled Task Wizard, click Next.
  6. Click Browse.
  7. In the File name box, type %systemroot%\system32\chkdsk.exe, and then click Open.
  8. Under Perform this task, click Weekly. Then, click Next.
  9. Set the time and day of the week you would like to run Check Disk. For best results, choose a time when your computer will be on but you will be away from it. Click Next.
  10. If prompted, type your password in both the Enter the password and Confirm password boxes, and then click Next.
  11. Click Finish.

4. Software Updates
Performing software updates is a critical part of maintaining a well functioning computer. Many new software programs perform updates automatically.

Windows 7
  1. Open Windows Update by clicking the Start button. In the search box, type Update, and then, in the list of results, click Windows Update.
  2. In the left pane, click Check for updates, and then wait while Windows looks for the latest updates for your computer.
  3. If you see a message telling you that important updates are available, or telling you to review important updates, click the message to view and select the important updates to install.
  4. In the list, click the important updates for more information. Select the check boxes for any updates that you want to install, and then click OK.
  5. Click Install updates.
  6. Follow on-screen instructions as necessary. *

 Windows Vista
  1. Open Windows Update by clicking the Start button , clicking All Programs, and then clicking Windows Update.
  2. In the left pane, click Check for updates, and then wait while Windows looks for the latest updates for your computer.
  3. If any updates are found, click Install updates. (Administrator permission required If you are prompted for an administrator password or confirmation, type the password or provide confirmation.)
  4. Follow on-screen instructions as necessary. *

 Windows XP
  1. Click Start, click All Programs, and then click Windows Update. (Note: Windows updates will only run in Internet Explorer. If another Web browser is set as the default, copy and paste the URL into Internet Explorer.)
  2. Click Express (Recommended).
  3. Click Install Updates.
  4. Follow the instructions that appear on your screen. *


'oncall service and repair'
-team PakarPC-
1800-88-7508

Sunday 1 July 2012

Free Tool to Convert and Resize Images


You want to resizes or convert your image to another format or size? you can use 'ObviousIdea free image resizer and converter'. It resizes and simply converts image, 1 by 1 or as a batch mode. Bulk editing to apply profiles to a set of pictures.

it’s available as windows shell extension. Just right click and you can easily create copies or you can work on the original HQ photos. Then share your resized photos online with friends. it’s a freeware if you use it for personal use.

** if you use for personal and not for business and it is free, the bad part (tak ikhlas) is they put advertisment and 'reminder dialog' but this software works like a charm


'oncall service and repair'
-team PakarPC-
1800-88-7508

How to Find Windows Version

Click Start, and then click Run, type 'winver' without the quote, and click OK. A small window will come up showing you OS details, version number, service packs applied (if any) etc.


'oncall service and repair'
-team PakarPC-
1800-88-7508

How to Find MAC Adress

what is MAC address?
MAC adress is a short form of 'Media Access Control' address. MAC is a unique identification assigned to network adapters/cards. MAC address is also called as Ethernet Hardware Address or adapter address. It is to uniquely identify your computer in a network environment.

How to Find It?
First, open a command prompt (cmd), Click your start button and then type 'cmd' in the search bar.


In the cmd windows type 'getmac' as shown below


Note: this command works with Win 7 and Windows Vista


'oncall service and repair'
-team PakarPC'
1800-88- 7508

How to Access Blocked Facebook

How to Access Blocked Facebook

Your connection to Facebook has been block by your university/organization that you work. Don't worry instead of using proxies thay may or may not work, you can use 'Unblock Facebook Proxy' software. It is free, easy to install and has been certified to be adware-free and clean by Download.com.

download here


'oncall service and repair'
-team PakarPC-
1800-88-7508

Write Discs for Free


If you want to compile and burn your data then 'Nero' is not the only software that your can use, Nero will cost you premium. We would also recommend you to use 'ImgBurn'. ImgBurn will cost you RM0.00.

The most reason people turn to Nero is its interface and not functionality. ImgBurn burns discs without any problems and most importantly it is free. You can download this software here.

-team PakarPC-
1800-88-7508